Payments Assist is a tool for streamlining your workflow, managing your incoming and outgoing payments, staying on top of your rent roll, and automating payment collection — allowing you to focus your energy on growing your business rather than chasing down payments. Payments Assist is free for owners and managers to use, and set up is straightforward and simple. Once initial set up is complete, you can get started collecting rents automatically via ACH or Credit Card, using the Assist Dashboard to manage your payments and rent roll, and having your residents use the ApartmentAdvisor Resident Portal.
Creating a Business Entity
To begin accepting payments, you’ll first need to create a business entity in the system.
You can create as many entities as needed. If your portfolio includes separate LLCs or bank accounts, each can be set up as its own entity to keep records organized. If you're operating under a single umbrella, only one entity is needed.
Note: Each entity requires its own payment setup and bank account linking process. To streamline your workflow, we recommend keeping the number of entities to a minimum when possible.
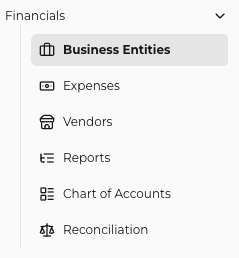
- First, navigate to Business Entities in the Financials section of the sidebar menu.
- Click Create Business Entity in the top right corner

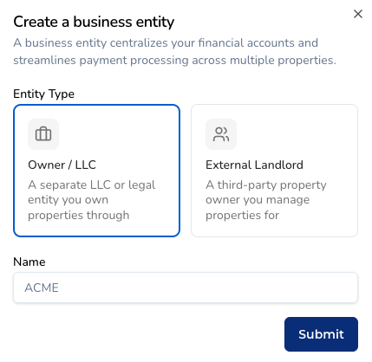
- Select the type of business entity you are creating - if you own the property, select Owner/LLC. If you are managing it for another party, select External Landlord. Enter the name of your Business Entity and click Submit to finalize.
- After creating a new business entity, you can assign properties and units to it as needed. All rent payments from residents of these units will be deposited into the bank account linked to the corresponding business entity. You’ll see a comprehensive list of the units you’ve added and can select individual units or use the bulk selection option if you’re managing everything under a single entity.

If you haven’t added any properties or units yet, a detailed guide for doing so can be found here.
Linking a Bank Account to Your Business Entity
After you've created your business entities, you can link each one to a bank account for receiving payments. Bank accounts are securely connected via Dwolla, enabling ACH transfers.
Once a bank account is added and verified, all payments collected from units associated with that business entity will be deposited directly into the linked account.
- First, navigate to Business Entities in the Accounting section of the sidebar menu.
- Select the Business Entity you are to linking the bank account with.
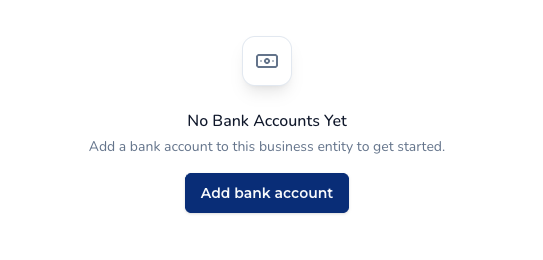
- Click Add Bank Account
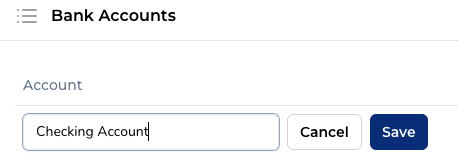
4. Choose a name for your Bank Account and click Save. This will create the bank account.
Incoming ACH Setup
Once the account has been created, you must link it with a payment method to receive payments. The easiest way to do this is by adding a checking account for ACH transfers. This will be allow no-cost ACH transfers into your account, with a $3 fee assessed to the tenant for each payment.
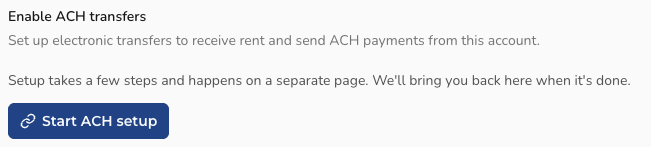
- To add an ACH payment method to your Bank Account, click Set up ACH.

- This will open up a new menu - click Start ACH setup to begin the setup process.
- This will lead you through the set up process for Dwolla, our payment processing partner, during which you will provide account numbers, business information, and identity verification to link your chosen bank account with your ApartmentAdvisor Assist account. During these setup questions, select whichever options best align with your business.

- You’ll also be asked to provide identity verification including DOB and the last 4 digits of your SSN before entering your account numbers. This is a standard security requirement to comply with financial regulations. All verification is handled securely through our payment partner, Dwolla. We do not store or have access to any of your personal information in our system. Once your account is verified, you will be able to send and receive payments using this account.
Outgoing Check Setup
Setting up Outgoing Checks from your account will allow you to issue payments to vendors, refund money to residents, and more. Outgoing Check payments are enabled using Postgrid online check printing and mailing service — ensuring your checks get where they need to be without you ever having to make a trip to the post office.
- To get started, click Set up Checks. Once the menu is expanded, click Start check setup to begin the setup process.

- This will lead you through the Postgrid setup flow, where you will be prompted to enter your account numbers.

- Once you have completed the setup process, you'll be able to send outgoing payments via check using Postgrid!
Review and Finalize
After completing these steps:
-
Double check that each entity has the correct bank account linked.
-
Ensure that all properties and units are assigned to the appropriate entity.
-
You’re now ready onboard your residents and start sending and receiving payments!